Documentation
Documentation
Still my favorite part!
Plaster spike
Went well!
After the plaster dried, it got stuck in the mold. I had to pry it out, and the mold ended up getting destroyed in the process. It’s also really heavy. Jo suggested I could fill it with lighter materials like paper first, then pour in the plaster to make it hollow. I think if I ever make something even bigger, I’ll definitely need to try that. I used oil-based ink for this one and it printed really well and the carborundum textures came through nicely. It’s made me feel more hopeful about future plaster print projects.
Jo also brought up something important during a tutorial, how I plan to display my artworks. What height should this piece be viewed from? What kind of material or structure should support it? It’s not something I’ve really thought about before, since most of my work has been 2D, made for walls or tables, and that’s where they belong. But 3D work is different. The audience moves around it, sees it from different angles. Display becomes a bigger part of the work itself, and it’s something I need to start considering more seriously when making sculpture.
The Pour
The plates are really sharp and pointy, so inking them up was a bit of a challenge. After that, I poured plaster into the mold. The thin plates actually held their shape pretty well, though there was some warping and bending under the weight of the plaster. It worked better than I expected, especially considering it was just masking tape holding everything together. I also added some clay underneath for extra support.
A New Beginning
I’ve always been interested in turning etching into something three-dimensional, but I never really had the time or space to try it properly until now. I’ve done some small plaster castings using zinc plates before, but this time I want to figure out how far I can push it, how big and ambitious I can go without spending too much. This piece is a mold made from recycled litho plates and carborundum. I was trying to shape it like a mace by combining different aluminium plate forms. It didn’t really work, the spherical mace idea failed pretty badly, but it was just a test.
Plaster Buckler Shield
Hammering and Hurting
I started looking into symbols and shapes, how we project our own emotions onto them. One example that stood out was Spike Field by Michael Brill. I was thinking about how to create something with meaning that lasts for decades. But then I realised how silly that thought can be, especially when even the language I speak might not exist in a few thousand years. That idea became a kind of starting point. After that, I was drawn to the ceremonial maces in the Tower of London. Maces were once weapons of war, made for smashing enemies to bits. Now, they’re covered in jewels and carry a kind of symbolic power that goes way beyond what any weapon could do. That shift in meaning really stuck with me.
My first idea for making a mold for the mace was to hammer a piece of zinc into a sphere. The technicians warned me against it, they said it would take way too much effort. I still really wanted to see if I could bend the metal to my will, so I gave it a try and failed. The picture on the left shows the result of six hours of non-stop hammering in one day. It was loud and the technician eventually stopped me from continuing. So now I’m left with something that looks more like a buckler shield.
Looking back, I think I was more interested in proving to myself that I could force the material to do what I wanted, rather than letting it guide the process. It’s a reminder that stubbornness doesn’t always lead to results, but it does teach you something. I don’t regret trying.
Etching it
I carried on and etched the piece anyway, just to see how it would look with all the hammered marks and scratches. I used liquid hardground and brushed it on. I always seem to forget how tricky it is to apply when it’s thick, my first attempt ended up full of brush marks. The second try was way better. Brian showed me how to just swash the liquid hardground around, which gave it a much smoother finish.
The drawing and etching part was quite simple. The only real concern was the hazard of breathing in nitric fumes. Since I’m working with a 3D form, the extraction hood, which is built for flat etching plates, was almost too short for the shield. It’s something I need to keep in mind for future works, especially when doing non-standard setups involving acid. Safety, for me and everyone around, has to come first.
The result was pretty much what I expected. When I inked it up, I was worried all the hammer marks would show in the print. It was surprisingly smooth for a plate that had been so beat up. The hardground lines came out fine and clean. That gave me the confidence to go bigger. I also tested some watercolor on the plaster, just to see how well it would work as a canvas. Aside from a little bleeding, the watercolor held up well. One thing to note is the plaster was very thin. After being moved a few times for tutorials, it ended up breaking into pieces.
Spike Field (1993) nuclear marker concept by Michael Brill; Drawing by Safdar Abidi. Image provided courtesy of the U.S. Department of Energy.
Final Result
Plaster Mace
I loved the process of drawing with a needle on an uneven surface. I felt like my lines were looser. The less control I had, the less I worried about making clean, beautiful illustrations.
I have been toying with the idea of creating a kind of religion, or maybe a war against repression. All the little figures and creatures on the mace would be characters from these fictional stories. To me, religion is one of the few things that truly lasts, and it always changes with time. That idea gives me a framework to build something that feels both personal and universal.
One half of the sphere is inspired by the creatures of Noviadi Angkasapura. His way of combining unconscious pattern-making with mythical forms really spoke to me. It inspired me to draw out my own fears as creatures. There’s also a kind of Joan of Arc figure in the drawing, casting them out using the mace I was making.
The other half is inspired by a live drawing session at Gail’s. Repression is something we carry in our day to day lives. It’s a double-edged sword, it helps us survive, but it also weighs us down. Sometimes we wear it like armor, and other times it clings to us like a small, annoying creature. It affects how we interact with others and how we face the world. I was also inspired by a very flat, two-dimensional drawing I saw at the British Museum. That influence made its way into this part of the piece.
Drilling a hole
To attach a handle to the plaster mace, I needed to drill a hole in one part of the hemisphere. With such a thick piece of steel, it would have been nearly impossible to drill it cleanly by hand. To use a machine for it, I first had to build a foundation to hold the sphere steady. I used the CNC machine to drill a perfect circle into a piece of wood so the hemisphere could sit securely in place while drilling.
While doing this, I started thinking about how I will keep experimenting after the Master ends. Working with this kind of three dimensional steel form means I will need access to different studios just to do basic things like drilling a hole. That is something I need to seriously think about. I may need to find other ways to do this at home without any power tools.
To tackle the problem of the ink not printing, I tried using a water based etching ink called Caligo. The theory is that water attracts water, kind of like how damp paper works with water colour monoprint. It should help activate the ink and make it print better. When I was casting with plaster, I did my usual tapping to get rid of air bubbles, but the vibration caused the ink to move through the plaster and spill out a little, as you can see in picture 2. After it dried, this one was way harder to get out of the mold. The best method I found was to keep tapping it with a spoon to slowly loosen it. It is a long process, but it works and does not damage the cast.
Third Ball
I figured that tapping the plaster before it dries is what causes the bleeding effect. So for the third one, I did not tap it at all. There was still some bleeding, but not as much as the second one. I also tried placing a rod in during casting, just to see how hard it would be to actually make the full mace, not just a sphere. The big figures like the knight and the creatures came out better than the small ones. The bleeding affected the larger figures less, so their details held up more clearly.
This test made me realise that some parts of the process are just out of my control, and that is not always a bad thing. I am starting to appreciate the unpredictable parts more, even if they do not match what I had in mind.
First ball revised
After failing some and winning some, I wanted to see what I could do with the embossing only ball from the first cast. I started rubbing different inks and materials on it to see how the embossing would react. The best way to make the lines pop out was to lightly rub it with oil based Charbonnel ink. I am really glad I did not throw this one away after disliking it at first. It gave me space to experiment without pressure, and that led to something unexpected.
The fifth one used a polymer outer shell with normal plaster filled in. It would not come out of the metal mold no matter what I did. It was completely stuck. I hammered it so hard that it made the metal mold deform. The cast did not hold up either. One part was just gone, and most of the polymer plaster got stuck to the mold. This one feels like a failure, mostly because of my lack of patience. I was too eager to pour, so the polymer layer ended up far too thin. I was also too eager to crack the mace out, and I broke the cast in the process.
I can feel my temper getting shorter with each attempt, especially when the results do not match what I had in mind. I do not mind that each mace has its own characteristics, but not having a single perfect cast after five tries is frustrating. Still, I know I am working in unknown territory and dealing with materials I am not used to. I need to leave room for mistakes and try to embrace them. At the same time, I do want to master this technique.
I left the ball sitting in the mold over the weekend. The rust built up a lot more compared to the first cast. The Caligo ink spread everywhere. I cannot say I hate this unexpected outcome. It actually fits with my idea of a weapon of war being worn down by time. I also got frustrated and hit the metal mold a few times to get the plaster out. I think the impact caused some of the plaster to break off and stick to the mold instead of the cast. This ball looks more like a planet than anything else. It is really interesting to see how small changes, like switching the ink, can lead to such different results from the same mold.
Fourth ball
For the fourth one, I tried mixing plaster with a polymer base, basically a poor man's version of jesmonite. I wanted to see if using less water would make a difference. It worked really well for the upper half, but the lower half did not print out again. Some areas came out very polished, while others were much rougher. For the parts that did not print well, I rubbed some ink onto them to match the colour of the printed sections. Then I used a scalpel to carve out the main figure of the story. The rough carved texture of the figure under the sun made my skin tingle. With the smooth and rough textures combined, the mace feels like something a Greek marble sculpture might hold, standing against the wrath of time.
My Alginate Try
Sixth try
My first idea was to use alginate casting, since it is faster and more economical than silicone casting. First of all, I did not have enough alginate. The calculations were off, so I had to do two rounds of pouring. The top part just barely covered the mace, so it ended up very fragile and wobbly. I was rushing it way too much. I also did not register the mold properly.
The cast came out very misaligned. It looks like a strange rubik sphere. It was my first time really looking at and holding this beast of a sculpture in my hands. The weight and the dampness coming off the mace head made it feel like its own creature. Like some kind of creature’s egg that gives you mystic powers. It might not be a successful cast, but I had a lot of fun throwing it around. The play aspect of these sculptures is unlike anything I have felt with the prints I have made before. Prints are always fragile. A simple scratch needs the most delicate touch to fix. These plaster maces feel more like toys than art objects. Even when they break, it feels like it is meant to happen. The idea that I can break as many of them as I want, and just make more with little effort, gives me the freedom to destroy without guilt.
Noviadi Angkasapura (2019) 'Untitled #7.19' mixed media on paper (16'' x 11.5'')

Notes on the balls
I had a talk with Pete about this mace casting process, and we figured out that it might be because of gravity that one half of the sphere is not printing properly with oil inks. Basically, the plaster from the top hemisphere shrinks as it dries, which creates a gap between the dried plaster and the matrix. That’s why the ink doesn’t latch onto the plaster on one side, but it’s still able to capture the line embossing.
So this time, I’m casting each hemisphere separately. That came with its own set of challenges, how to register the hemispheres, how to cast the second one with a rod already in the way, how to make sure there’s no gap between the two, and how to hold the rod in place while casting the first half. All of these questions were answered through improvisation and a lot of labor.
To be honest, I’m quite bored of this sphere casting activity, and I’m running out of time because of the Millbank exhibition. It is nice to have a mid term goal to show all our work, but it also limits and pushes me in ways I did not expect. I cannot say it was a bad thing, but I feel like I did not rise to the occasion this time with this piece. If I had another chance to approach this problem, I would have slowed down between attempts. I needed time to reflect on what I had done and think of better ways to move forward, instead of rushing to the finish line. I also regret not making etchings or wood engravings alongside the plaster experiments. If I had something else developing at the same time, the pressure for Millbank would have felt lighter, because I would have had other work to show if this one did not go well.
I 3D sculpted this on an iPad, then 3D printed it. That was the easy part. The hard part was sanding it. It took quite a while, but I found out you can use plaster like filler to smooth out scratches and layer lines. I loved how it feels and how complete it looks with just a bit of extra care. It reminds me of Noguchi’s work. Simple, organic shapes that somehow make people feel whole.
First try
The first try did not go as expected. The ink did not stick to the bottom half of the mace. It left a perfect white embossing instead. Pete has told me before that plaster printing is quite a hit or miss process. Sometimes the results turn out better than expected, and sometimes they just do not work. I was actually quite disappointed with this. I put in so much work, only for the plaster to not print properly. My expectations were way too high, and the failure made me more frustrated than usual. There is also the issue of the steel reacting with the plaster and oxidising. Maybe I can use that texture to create something else.
Obviously I was going to make a silicone mold after the alginate failed. I have done this so many times I could do it with my eyes closed. But this is an abnormal shape to cast. I think next time it would be better to waste a little more silicone and just make a cube mold. That would make it much easier to register everything properly. This irregular shape was made just to save material, but it ended up causing problems later when it came to casting and alignment.
My plan for this spiky cast is to cover the plaster mace in a clear material. There are three materials I wanted to try, glass wax, gel wax, and resin. Resin was my first choice because it is easy to use, does not need heating, and has a long working time before it sets. Unfortunately, resin is not allowed in the college, and I do not have a space to work with it right now, so I have to put that idea on hold. Glass wax was the second choice. There are only two options when buying it, either 500 grams or 10 kilograms. I just prayed the 500 gram one would be enough. (Foreshadowing.) I was pretty anxious, because when the glass wax arrived, it did not look like enough, and the Millbank exhibition was only two days away.
I’m surprised I didn’t get burnt once when melting and pouring the glass wax. It actually went quite smoothly, but it wasn’t enough and about 30 percent of the mace didn’t get cast. There were also a lot of bubbles and layer lines where the wax dried between pours. It looked really cloudy at first, but I found that some white spirit melted the cloudy areas right away. The result was not great, but I’m glad I tried working with glass wax. It’s a really fun and brittle material. It feels like flint or obsidian, the way it breaks into sharp edges. It reminds me of how early humans made their spears. I wonder if that could be a separate weapon project, a clear flint spear?
https://whitehotmagazine.com/articles/divine-excess-possession-noviadi-angkasapura/4701
Acquiring the balls
After failing to make a sphere by hammering, I started looking for pre-made hollow metal hemispheres. Copper and zinc were way too expensive. I found one that’s meant for making spheres on rooftops. It’s made of steel. It might not be the best material for printing, but Brian assured me it can be polished enough to print white.
Polishing it took three days, working from 300 to 1200 grit. It felt really smooth and satisfying when it was all done. I was aiming for a mirror finish, but my patience got the better of me.
liquid hardground coating
Etching it
Second Try

The second coming of ball
The Cursed Fifth Try
3D printed mace head
Gooey Silicone
Glass Wax No Wax
Plastic plaster experiment
This is where I need to talk about the tutorial with Paul. I feel like I did not prepare enough for it, and I did not explain my whole process from the first term until now. I thought he might get bored, so I skipped straight to the parts that interest me the most, the plaster casts. From the start, he was not impressed. He kept talking about plaster, how to use it properly, and how the material does not last. That really threw me off. I thought someone like Paul, who has seen more artwork than I could imagine, would appreciate experiments. I had high expectations going into that tutorial, and the comments I got from him did not match them. That is probably why it stuck with me so much. It was his first time seeing my work.
There are a few things I can do differently next time, at least I think. First, I could put together a short presentation that explains my art practice from beginning to end. Second, I should show the works that are more successful, instead of the newest or most experimental ones that only make sense to me. The conversation really rubbed me the wrong way, but I know there will be many conversations like that if I want to put myself out there as an artist. I just need to grow a thicker face and manage my expectations. I think that is it.
The left one is printed with water based ink, and the right with oil based. Their textures are very different. The water based one is very expressive in its tonality. There is also a fuzzy texture on the heavily inked surface, almost like black moss. The oil based one captures all the details of the plate, even in the areas where only the acrylic binder remains. The only issue is that the sections with a lot of carborundum look like they have been open bit. There is a lot of texture, but no ink holding on. I wonder if I will need to mix these two inks for different areas to make the final piece. The dark, expressive parts could be done with the water based ink, and the detailed areas could be handled by the oil based.
Is there a point in Drypoint
After Millbank, I figured the metal matrix was the main reason why this mace has been so hard to finish. It is too rigid and too reactive for plaster casting. The results are more explosive because of those factors, but in the short time frame of this Master, it might not be the best way to go about it. So I started thinking about alternatives. Plastic drypoints and carborundum seemed like the next logical step. To test if plaster casting would work with a plastic matrix, I did a small experiment of a crying woman.
THE Tutorial
Alginate as Skin
Water and Oil, please Mix
This is an experiment with alginate and water based ink. Alginate has a very interesting property, it changes a lot as it dries. It starts out as a wet, jelly like texture and slowly turns into something like shriveled orange leather. Plaster dries too, but it is less dramatic. It just goes from wet hard to dry hard. Alginate with the water based ink on top looks like a rotting wound, with black blood oozing from the cracks. I wonder if I could use this as an analogy for repression. Skin hardens over time, but the more it hardens, the more brittle the layer becomes. I cast this one a bit too thin, and when it dried, it cracked into several pieces. Maybe I need to cast it thicker than plaster so it stays in one piece.
Plastic Armor
My Rough Idea
Paper Mache is for All Walks of Life
After testing out the drypoint plastic experiment in the previous days, I decided to use vacuum forming plastic to create the matrix instead of metal. There is just not enough time, and I think I would actually go insane if I worked with a metal three dimensional matrix again. To get a shape ready for vacuum forming, I needed something heat resistant, hard enough to hold under the pressure, and still easy to sculpt. Surprisingly, all those needs brought me back to plaster.
To avoid wasting plaster, I built the initial rough shape with newspaper and masking tape, kind of like making a paper mache base. I found out this method is not great for creating sharp corners, and I was not very confident after seeing the shape. But I carried on, hoping the plaster would save it.
Suck
Sculptural Plaster
I saw this plaster sculpture at Belvedere and have been thinking about it ever since. From the look of it, the sculpture was built by sculpting directly with plaster. The rough textures of the plaster contrasting with the smooth colour gradient made it feel like an oil painting brought to life. That is how I got the idea to create my shapes by sculpting plaster.
When I started, the plaster was so runny it would not stay on the paper mache. It took a lot of pushing and pulling to keep it in one place. It only got easier once the plaster started to set a bit. Then it began to stick and stay in whatever shape I sculpted it into. This was a new process for me, and I was actually really excited about using plaster as an active sculpting material instead of just a passive casting material.
After it dried, I rasped it a lot to get it into shape. There are still quite a few dents and bumps on the armor. I am not sure how I feel about that. At this stage, I do not really have a clear idea of what I want the armor to look like. So, as an experiment, I decided to keep the dents and move on to the vacuum forming.
Now that the Summer Exhibition is just around the corner, I have to start thinking about the final product. My thinking is, I made a weapon for my warrior, so it is time to make a full set of armor as well. Plaster is the material I am most interested in. I love the brittleness, especially. It is always ride or die with plaster. It is unforgiving but satisfying to work with. I am also really drawn to the range of textures it can hold. From chiseled to glassy smooth, it can do it all. The most important thing is, I think only plaster or alginate can do what I have in mind. I might make an alginate suit just for fun, when I have time.
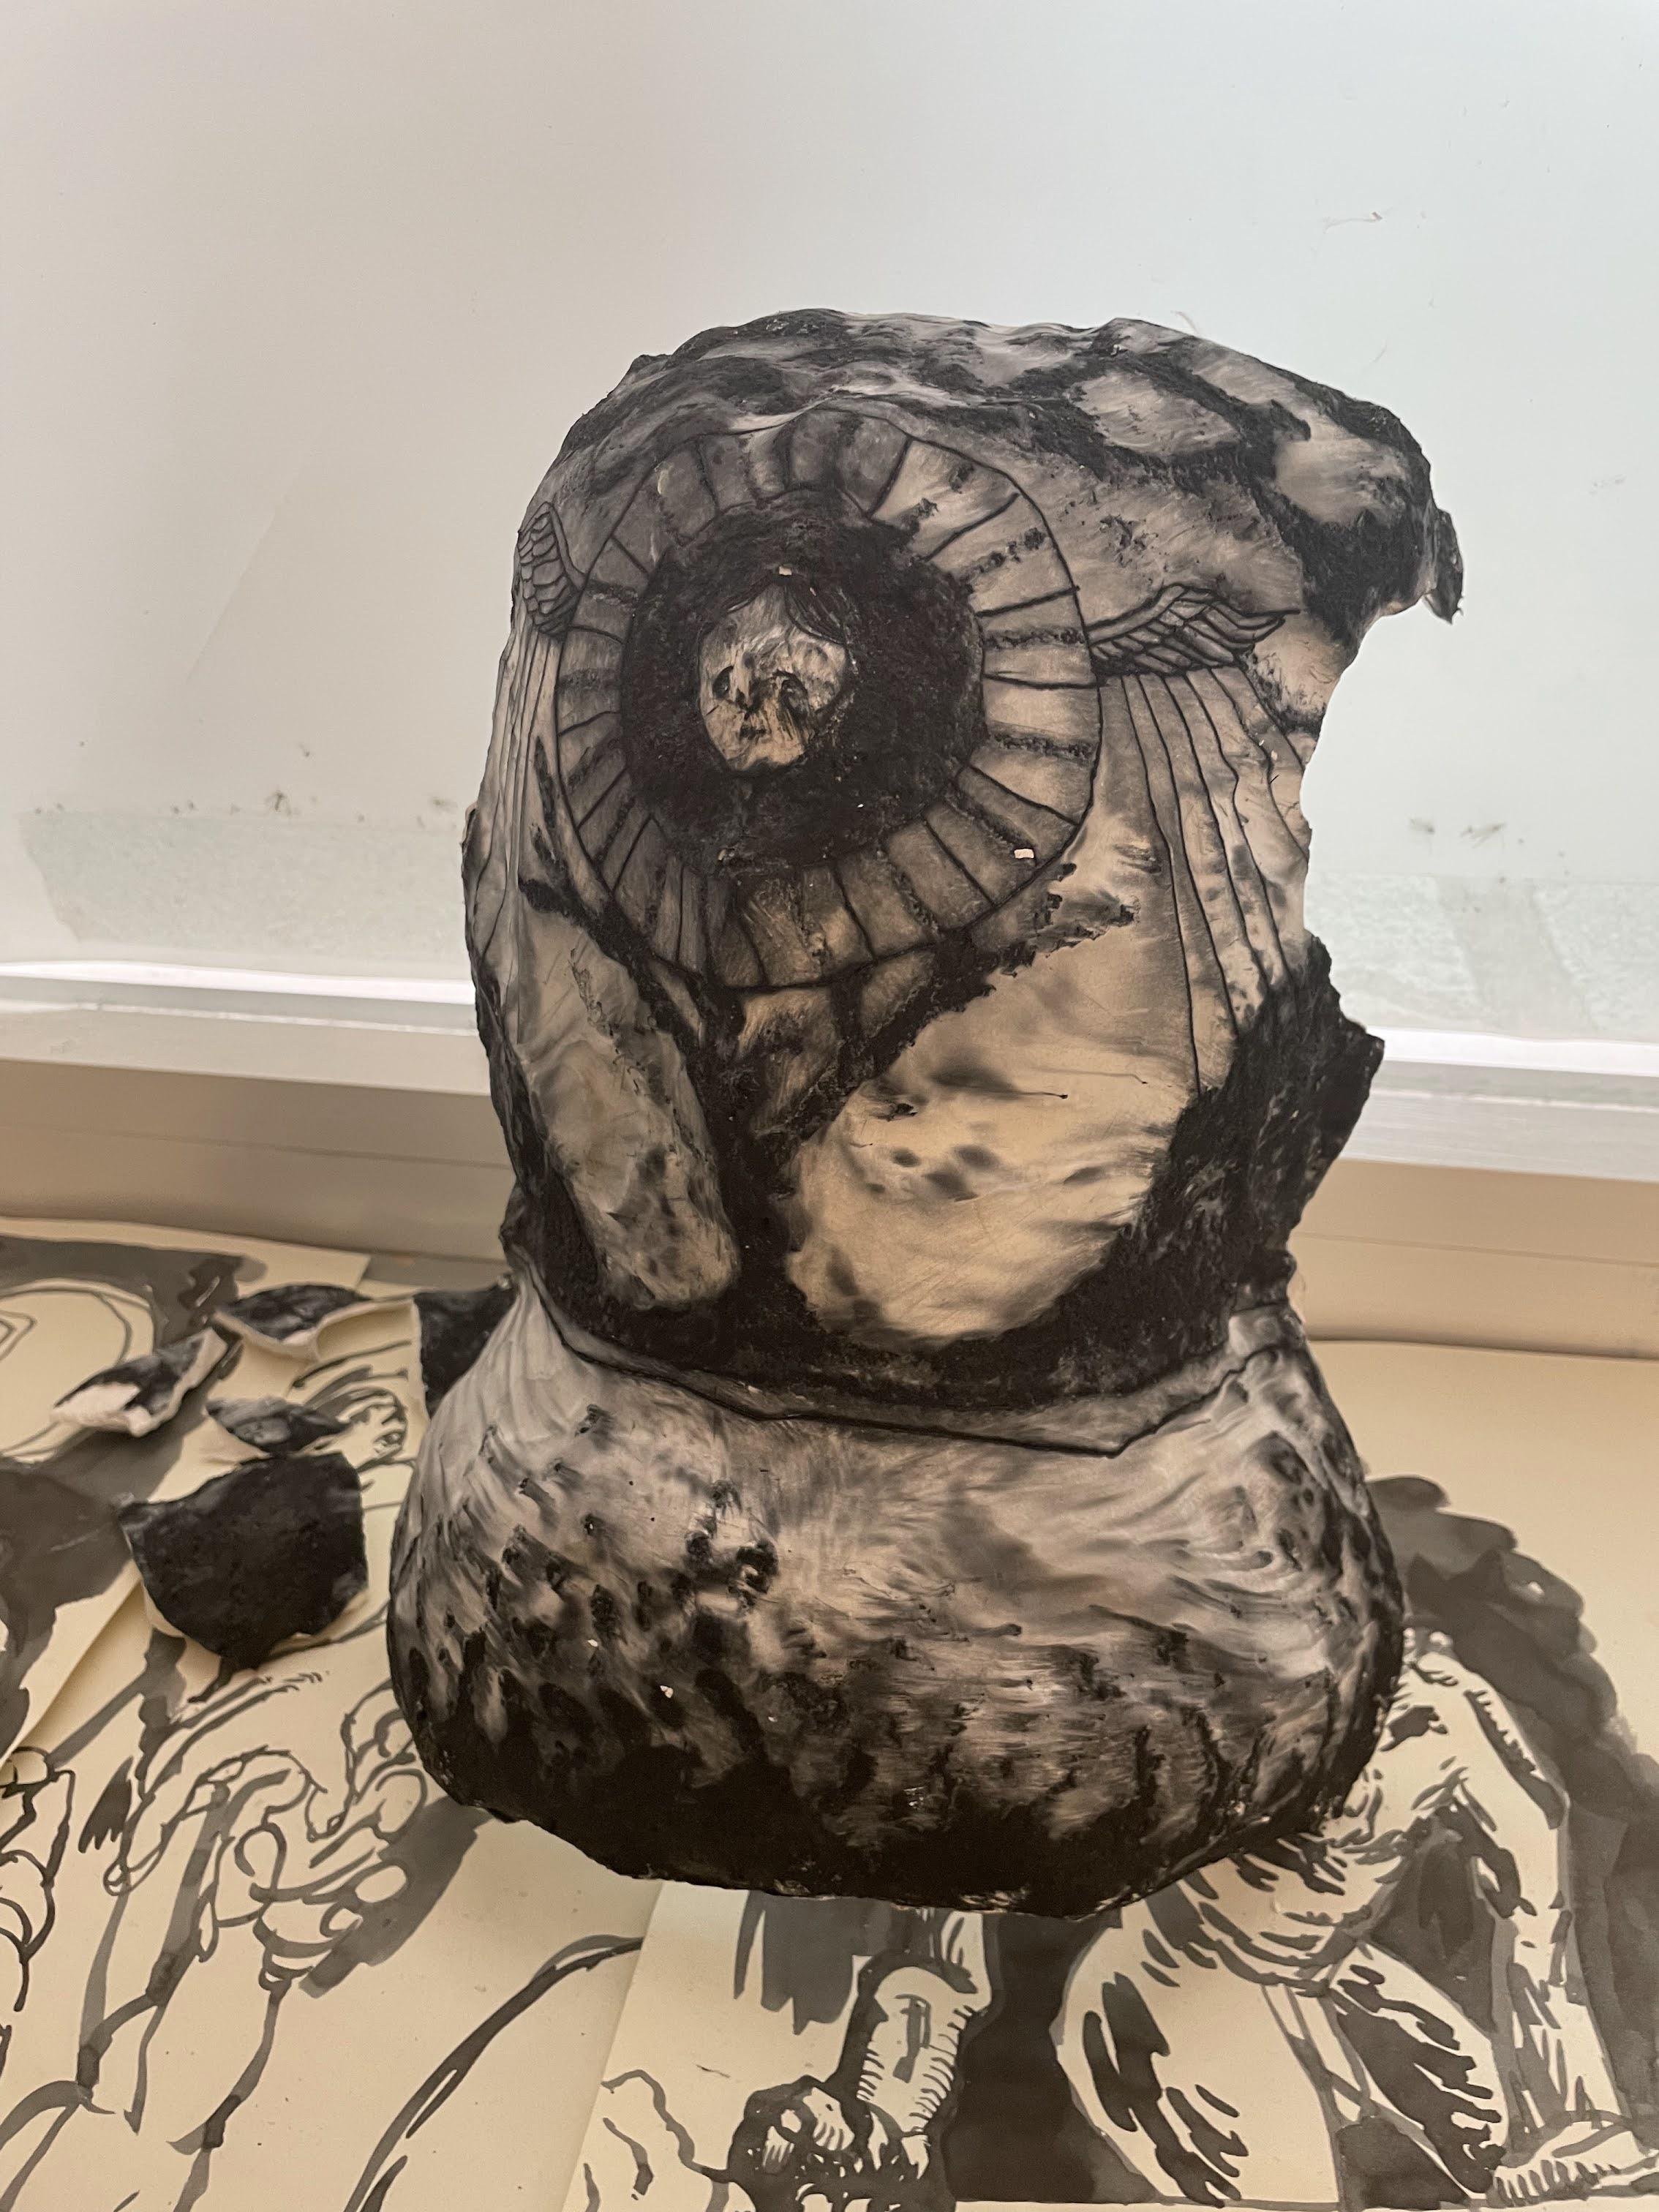
I am pretty happy with how my armor test turned out. All the details have been captured. It also feels holy when I am holding this piece of thin plaster. It is not supposed to exist. It is very fragile. The only regret is how bumpy it is. I should have sanded it down more when I was making the plaster mold.
It was my first time vacuum forming. It was a pretty easy process. Put the object in, heat the plastic on top of it, use the vacuum under the plastic, and the plastic takes the shape of the object. Voila. There are a few issues I need to look out for in the future. The first is undercuts in the object. If there are any, the plastic will wrap around them and make it hard to remove the form. The second is holes in the surface. In this case, I had a hole, and because of how the vacuum works, the pressure popped the plastic. Once that happened, the vacuum stopped working properly, and the plastic could not wrap tightly around the object. It is just something to keep in mind.
With Sand, I will build my Empire
I then trimmed the plastic into the shape of the breastplate. The plastic was harder than I thought, and it cracked easily when bent too much. They only provide one millimetre thick plastic sheets at the vacuum form station. It might be better to buy thicker ones so the shape is more rigid for what I am doing. The carborundum sticks well, and the drypoint needle scratches the plastic flawlessly. Inking it was a bit of a challenge because of how flimsy the plastic is and the awkward angles I needed to reach to get into the gaps.
Thankful Engraving


Besides working on the sculptural stuff, I started a plastic engraving at the beginning of this term. It is still something I really love doing and will keep doing for the foreseeable future. Because of the steep price of wood engraving, I have been looking for other materials to engrave besides wood. This plastic, bought from Intaglio, feels much stickier than wood. The carved bits tend to cling to the plate. Adjusting how I cut the plastic helped a bit, but it was not a pleasant experience to work with.
The upside is how cheap it is. I did this with almost no preparation. I carved lines from left and right without a care in the world. I love the organic shading and the variation in strokes that came out of it. It feels much more alive than the wood engravings I have done before. I have heard of something called resingrave, a resin material that apparently carves just like boxwood. It is no longer in production, but I really hope I can get my hands on it one day.
Big lino


I started this big lino just before the Easter holiday. I went to the Wallace Collection to look at all the medieval knight armor. I got really inspired by them and started working on this big piece of lino I had. It was great drawing and carving these imaginary beasts and armoured knights fighting. The more I carved, the more I realised this had nothing to do with the project I am working on now, so I stopped carving for the time being. I will continue after the Master.
Oil Painting
When I went back to Hong Kong for Easter, I did this in my free time. I have been trying to pick up oil painting for a long time. I have painted here and there, but I really wanted to finish a self portrait, especially because of the self portrait open call I see every year. Shame I did not have time to finish it in time. Still, it is always fun to paint with so many colours at my disposal.
Moving Forward


With all the experiments done, I am now starting the scary and long journey of creating the actual armor and etchings for the summer show. I have always been an anxious person, and making something like this in just a month's time is really daunting. There are so many variables. But I will just carry on and see how it goes.