Documentation
Documentation
The relentless turmoil
Plaster armor
Forming Shape
Now for the real deal. I mock up the pieces using my own measurements. I literally put newsprint on my body and rough out the shape of the armor. It feels like the easiest way for me to create a proportional template for the whole body, because I will always have my own proportions to return to.
I then use newspaper to stuff up the three-dimensional shape of the armor, adding a little paper mache to cover the whole form with a smooth layer of newsprint. After that, I apply plaster on top to bulk up the shape.
The first time I did the plastering, I worked while the plaster was still very wet and liquid. When I tried to smooth it with a rasp, as shown in picture three, the bumps and dips were very visible. I then added three more layers on top of the first one, sanding and rasping between each to create a smoother surface.
I made the chest plate first because of its sheer size. My thinking was that if I could make the biggest piece work, the rest would be a cakewalk. There was quite a lot of trial and error with this first piece, and the extra sanding and bulking that came from those mistakes made me a bit scared of what I had started. But it also gave me the confidence to finish the other parts. I think I made the right choice doing the big one first; I would have been much more stressed if the thought of failing on the largest piece lingered while I worked on the smaller ones.
Vacuum Forming
The technician said it was not possible. A common thing technicians say to me. I cut the chest plate into two pieces. The first piece was the one I worried about because of its shape. Vacuum forming works best when the form has no sudden drops in contour and the highest point sits in the middle. This one had neither.
I also stuffed clay into the areas where the plastic would otherwise get sucked in and ruin the vacuum. Next time, I would wait a bit longer for the clay to dry. The vacuum was too strong, and the clay deformed while forming, which made the demolding much harder later.
I also did not take the colour of the plastic into consideration. Darker colours like purple made it hard to see my drypoint and carborundum marks, and difficult to ink properly. It basically complicated every later step.
The technician recommended that I do the vacuum forming somewhere else, maybe at a car factory, since they have industrial machines that can handle larger shapes and thicker sheets of plastic. I think thicker plastic would have helped a lot. The one-millimetre sheets were a pain because of how flimsy they were. Due to time restrictions, I went with these materials because they were the only ones available.
Merging problem
The merging part was a pain. How do you merge two pieces of plastic smoothly with only a one millimetre thick surface area? The answer is you don’t. But I tried anyway.
At first, I used epoxy clay to join them. It sticks to almost anything, is easy to mould and can be sanded. It snapped off after it dried. The second time, I used strong tape to hold them in place first, then added the epoxy to connect them. After some sanding and scraping, it stayed together well enough.
All of these problems came from not having a big enough vacuum forming machine. If I ever make something equal or bigger than this again, I’ll find somewhere that can do it for me. All these hassles are not worth the time. I also accidentally scratched some of the plastic, but luckily the sculpture is detailed and large enough that the small marks are not obvious.
First Time Plastering
I was so excited after I managed to stick the two halves together. I ran to the foundry to cast one of the first life sized pieces of armor I had ever made. I used normal plaster. That was when I started to realise how quickly the consistency of plaster changes from liquid to solid. There is a short window where the plaster has the texture of wet sand, soft enough to mould but firm enough to hold its shape.
The steep contours on the sides of the armor were especially difficult. The surface was too smooth for the plaster to grip onto, so it kept sliding off. I was surprised by how tough normal plaster is. It still shatters easily if I kick it, which I did later, just for fun. The seam line where the two molds joined was very obvious, but I hoped the illustrations I would add later could cover most of it.
At this stage, I was still worrying about how to display this massive armor set. Would breaking it apart like in picture three work? If it was broken and half buried in the ground, it might look like an excavation site where a medieval armor had just been uncovered, an armor that carried history and stories. It would also hide many of the imperfect casting marks. More importantly, it would guide the viewer to read the work in sequence and draw them into the mystery of this armor. It is an idea I want to explore further in the future. Relics.
After I knew it was possible, I dove in to create the whole body. I only made the pieces that were necessary. For example, I created one shoulder piece and used it for both the left and right sides. It helped me meet the tight deadline. The more I made these pieces, the better I became at building the paper mache to plaster models.
I was pleased with most of the plaster models, but some of them felt out of control. The shapes were simply untamable with my current skill set. With patience, I managed to shape them into forms that resembled each armor part.
Here is a small reminder to myself: wear gas masks. Protection is important for artists. The materials we use often come with hazards, and taking care of the body is the most important part of a long and healthy career.
I also found that smoothing plaster is easiest with a knife. Scraping it with the blade creates a shiny surface. I switched from using wooden boards to aluminum sheets as the base. They make it much easier to peel the plaster off and cleaning is a breeze.
Making of forms
Finger problem
The finger is a problem on its own, The plaster form is very hard to make once it got small like the finger, I made them but it doesnt loook anything like a finger, more like a sausage. Vac forming them wont look hood, so for the finger, i chose to use the aluiminium plate as base, then bend them to match the curvature of my fingers. The fingers didnt even make it into the final exhibition, but an attempt was made, sop i want ot document it here. ALso here is the finished sculpture ready fgpr vac foprming. With all the extra plaster i put on for smoothing, it ended up much bigger than me. It was really satisfying seeing all my hardwork put onto thee floor for the first time. I am very content with the proportion of the figure. Easpecaillly the hand where i propped it up, looks like a real hand trying to push the body off the floor.
Bulk Vacumm Forming
Here comes the enjoyment: making marks on the plastic. I figured out there are two ways to go about it. The first is drypoint, the plastic is rigid enough to carve lines into with a drypoint needle. The other is to use carborundum. It creates a battle damaged and dark texture when printed. The ink deposits also make it shiny when printed with oily inks.
In pictures three and four, I tried inking and printing a little just to see how it looked. To no one’s surprise, the oily ink did not get picked up by normal plaster. It has been a problem since the mace. I guess I am limited to water based ink like Caligo for this process.
Everything else is going smoothly. The thinness and light color of the plastic create a great atmosphere for drawing the draft on the other side. With a bit of light, the drawing shines through to the casting side, making it easy to follow those guidelines and create my perfect image. It also took a lot of pressure off creating a beautiful image while working on a curved surface.
Discovery of Jesmonite
Casting time
Here are all the vacuum formed pieces. Working in three dimensions is so much more satisfying than in two. It might be the reason I love printmaking more than traditional drawing mediums. It is so gratifying to work in this two and a half dimensional way, mastering the materials and turning them into my objects of desire on a whim. I feel like this is where I am heading with future works, into the world of three dimensions, and maybe even four, if that is possible in this realm.
Water based or oil based, that is the question. Oil based ink simply does not work most of the time, although the result is amazing when it does. Water based ink works most of the time, but there will always be some bleeding. The more you agitate it during the casting process, the more the bleeding appears.
With the tight deadline, the best option for now is to use water based ink, poured slowly onto the plastic with no agitation at all. That method works well enough, with minimal bleeding. It almost looks as if some areas are out of focus because of the bleed, while other areas that remain sharp seem to be in focus. It is something I could explore in the future to create a sense of depth of field.
Pete gracefully lent me his trolley, which I used to cart everything to digital fabrication for vacuum forming. To save on cost, I sometimes placed multiple sculptures under the same plastic sheet. It is not recommended because of how thin the plastic is, but I pushed through with no problem.
I used lighter colors like orange and yellow for vacuum forming because of the issues I had with darker plastics earlier. After vacuum forming all the pieces, cutting them out proved to be a challenge. The plastic loves to cling to the form, creating a tight pouch around the sculpture. An hour with a scalpel and a lot of accidents later, I finally freed them all from their plastic cages.
It was also very nice of Ollie to try wearing them for me. I am getting more and more excited about the sculpture the closer I get to finishing it.
Making Marks
Inking up is fairly simple. I ink it just like I would an etching plate. I tend to leave more ink than usual so the lines stay clearer after the bleeding. It also creates very strong black areas in the carborundum sections.
I also place clay under the plastic to give it structure. One of the problems I encountered when casting with plastic molds for the first time was that the thin plastic wobbled when the heavy plaster was poured in. That movement changed the shape of the cast. Placing clay in crucial spots prevents this from happening.
Casting mostly comes down to controlling the drying time of plaster. You need to wait until the plaster is solid enough to stick well to the plastic, while also holding its shape on the curved surface instead of sliding back into the lowest spot. I also have to move slowly and carefully so I do not agitate the plaster too much. Sometimes I need to wait for the first layer to dry before adding another, just to thicken it enough to make it durable.
The edges of the mold are something to be mindful of. When they harden and are not clean, it takes forever to grind them back to a smooth finish. All the changes must be made within the ten minute drying window, or it becomes very difficult to adjust afterwards.
A small health and safety note: wear gloves when handling fiberglass. It sticks to the skin and causes irritation.
The Ink dilemma
Jesmonite is a company name. It is basically an acrylic based medium mixed with plaster. What that means is less water content, so less bleeding. It is also much stronger because of the acrylic bonding agent, and I can add fiberglass to make it even tougher. I was surprised by how unbreakable it is. It took all my strength to break one of the pieces apart, and unlike normal plaster, it does not shatter. It holds its shape really well.
Here is a small experiment I did with oil based ink on Jesmonite. It works well when used on a flat surface, but three dimensional casting still faces the same problem of not capturing the ink properly.
Inking up
Detailed Shots
Things I would improve on if I had the chance to do this project again. I would spend more time on the image making process. I rushed that part so much, creating and drypointing all of the imagery in about a week. Most of the other time was spent experimenting just to see if the project was even possible.
I also think the shape of the armor is quite standard. I would take more risks with the design of each piece to see if it could carry more emotion. The medieval European inspired armor aesthetic is tied to a lot of history and narrative. It has its merits, easily recognizable, but it is heavily shaped by the history it represents. I visited different museums in London to study various kinds of medieval armor, and maybe that influenced me more than I thought. I should have looked more into armor from other cultures. Samurai armor, Chinese armor, and Middle Eastern armor all look fantastical. Next time.
I also want to fix the issue with water based ink. To be honest, I do not mind the bleeding. It is the lack of control that interests me. I want to see if there is a way for oil based ink to print beautifully in this process.
If I had more time, I would also clean up the edges of the armor. Some parts still have fiberglass sticking out. I trimmed them as best as I could with snippers, but sanding might be needed for a truly beautiful finish.
Big Reflection
This etching is for showing off. I also had this big piece of copper from a friend who went back to China. It cost her around one hundred and forty pounds, so I figured I had better use it before I lose it.
I was still very interested in translating motion through etching. I had done a few pieces before about pushing and pulling, but I wanted one that incorporated the mace. I also played a bit of golf in the summer, so it felt like the perfect opportunity to create this etching.
I had no idea how I would approach it, so I started the way I begin most etchings: drawing and references. I grabbed some large sheets of waste paper and started sketching with charcoal. The image came so naturally that I knew I had to translate it into an etching.
I have been using hardground as a way to draft directly on metal. It feels harsh and permanent, but with how much I throw at a plate, a few hardground lines mean nothing. I have also grown more confident in my linework, so I can draft straight on the plate with hardground. Starting on such a big piece of copper was a challenge, but with a leap of faith, I began this incredible journey.
I also started making Instagram reels. It had been on my mind for a while to record parts of my process. Seeing other artists share their work on social media inspired me to do the same. I thoroughly enjoyed making the videos and laughed a lot while editing them. It is something I want to continue after finishing my master’s, to create etching videos that both educate and entertain.
Swinging (Etching)
This one is pretty self explanatory. I threw everything at it. When I say everything, I mean EVERYTHING, soft ground, hard ground, sugar lift, spit bite. Nothing really turned black, it all just muddled together into a pool of grey. I hated it.
Maybe it was my lack of experience etching copper with ferric, or maybe it was the weather that day. I got more and more frustrated every time I test printed after etching the plate with something new. A copper test plate would have solved everything, but I am a stubborn guy who believes in the mysterious force of alchemy. I do as I feel, that applies to etching and to my life, and I am not changing that anytime soon.
Maybe next time I will feel like doing a test plate, because it is excruciating to keep etching the same plate over and over again with no visual confirmation from the prints. I could also keep building it up like Norman Ackroyd does with his spit bites. I think the key is patience, which I severely lack.
Throwing Everything in
Big Reflection
Ah, this is the soap ground that ruined it. Patience is what I lack, and it came back to bite me. The way I drew those lines and circles was so rushed that it turned out terrible. They look like they were drawn by a six year old. I etched it for far too long, until it was almost full black, covering every subtle texture that I had both loved and hated from the earlier processes.
Now it is just a white ground print that looks nothing like the image in my mind. I remember taking a two week break from this plate after that. I was so scared I had ruined it, avoiding it like the plague.
The Save
It did bring everything together. I am so glad I stuck around for this print. It might be my favorite piece I have made in a long time. It feels perfect. There are no words that can fully express how much I love it, but maybe a little reflection.
I am quite surprised I persevered with this print. Maybe it was the sheer cost of the copper, or maybe it was my stubborn belief that I can fix any plate. Either way, it always brought me back to this print, and I am glad it did.
I remember working on this under a very tight deadline, with the plaster armor always lingering over my head. This print was meant to be an afterthought. In truth, I love this print more than the armor. The armor feels forced, this feels genuine. It comes from my heart.
I need to merge these two things together: innovation and my practice. I feel like I compromised too much of myself and chose innovation as the path forward. I lost part of who I am making that armor. It feels like a stranger rather than a labor of love. I need to find a way to make those plaster sculptures truly mine, through imagery, through form, through voice.
I do not know what the future has in store for me, but I know the only way to get out alive is to project my voice through the medium that feels like home.
The Disaster
I came back to it after the two week break feeling refreshed. Most importantly, my confidence in fixing it was at its peak. I knew in my blood that I could save this ugly work. I burnished and burnished, especially around the arms, the maces, and the head, the anchors in the image for viewers to hold on to. My hands were gone after all the burnishing I had done. The soap ground had bitten so deeply that some residue still remained even after three days of burnishing.
When I got bored of polishing, I decided to return to what I do best, hard ground. I hoped it would bring everything back together, restoring order to this chaotic print.
Summer Show Setup
I need to start at the beginning. We were responsible for cleaning up the studio for our show. That included cleaning, pulling nails from the walls, sanding the walls, taping the joins, and painting everything. It is not bad if I only need to do my own part of the exhibition, but this was a community effort for the entire MA Fine Art group to prepare all the floors we were exhibiting on.
There were some kind people who helped with exhibition spaces that were not theirs, and I will be forever grateful to them. But there were also students who did not lift a finger, some hid away to rest, others simply did not come in at all. I can’t imagine being one of them. I will remember who was good.
I am just glad we finished everything before the show, and that the people who gave their best had enough time to finish their displays. I don’t understand how selfish or self centered you need to be to not help at all, though I hope they had their reasons. There were some disgruntled noises from students, but nothing was done. Nothing could be done, forced labor was banned long ago.
This experience opened my eyes to how selfish people can sometimes be, and that relying on others can be a childish thing to do. But I also had a lot of help when setting up my armor. All the technicians, Jo, Leo, and my MA Print colleagues, I would not have been able to do it without them. Maybe the trick is not avoiding reliance altogether, but finding out who to rely on.
The exhibition was really fun. I put on my brand new cowboy boots and stomped around meeting new people. Honestly, I couldn’t ask for more. I did end up with a really bad stomach at the end, maybe from too much whisky.
I also won a prize, which was great. I emailed them afterward but never got a reply, which was a bit odd. I had hoped more would come out of the show, but it was enough for now. I am also completely burnt out from the course and the plaster armor. I am so ready for the summer holiday.
Hausprint Vacation
Chinese Boxwood
Buff Jesus
Wood Engraving Alternatives
During summer I tried things out. I wanted to see if there were any alternative blocks for wood engraving. I didn’t want to keep buying from the same person over and over again if I could make something myself for much cheaper (spoiler: I couldn’t).
This one is Resingrave, a resin material that was developed long ago, though the inventor stopped making it. I found some for sale from someone in the Wood Engraver’s Society magazine, so I jumped at the chance to buy them. I had been dreaming of owning them for a long time.
I wanted to make a small name card for myself. It cuts so differently from wood that I never finished it. Never meet your heroes, I think that applies here. The design was solid though, so I might try it again on real wood in the future.
Bought this chunk of Chinese boxwood for three pounds, three pounds! Neil, the technician, said it was too light to be real boxwood. I knew it was too good to be true, but the grain was tight, so I decided to try making it into carvable blocks. Some wood turning and sanding later, a usable block was carved out. Then the problems started.
The wood was far too green. You could smell the forest inside it, and soon it began to crack. I followed Neil’s instruction and glued the edges and the surface, leaving out the middle. That helped slow the drying and prevented cracks in some pieces, but not in others. I still have one more chunk to test once it dries naturally.
After a few weeks, it was dry enough that I could no longer smell the dampness, so I took a gamble and brought one home to engrave over the summer, and engrave I did. I am still obsessed with the idea of maces as all-powerful weapons that deter repression. I didn’t think much about the imagery at first since I considered it a test, but the more I engraved, the more serious I became about turning it into a real print.
I should have sanded it more, you can still see some glue residue on the block when I carve. I was also inspired by merging armor with the human body, just like how Dürer drew his rhino. I drew my own body cut up into pieces. I’ve had mixed opinions on whether it works visually or conveys my message clearly. I’m still too early in finishing this print to figure that out, so please give me more time.
With a bit more time on my hands, I also started filming myself again, a fun little experiment of me editioning the woodblock at HausPrints.
Enjoying Etching
Here is another small experiment I did on hardground. This one I didn’t even draft; it just came out of nowhere. Strangely, I love this image. It is not me, but it looks complete. The stare in the creature’s eyes tells me more than what any of my etchings have ever said.
I don’t think the enjoyment of drawing lines has changed much in my work, but my perspective on those lines has. I am determined to share this new feeling with other people, how, I have no idea. Maybe a workshop could be a good start, though for beginners, etching might be too difficult. They are often too self conscious to lose focus and flow with the lines.
Maybe etching is where I find comfort in the line, but it might be different for others. I can almost begin to appreciate why Picasso drew those one line birds.
Enjoying Lines
This one is for pure entertainment. I also wanted to focus a bit more on the video side of things, so the imagery is purely recreational. I forgot how fun it was to just focus on lines. Each line I create feels like destiny. I was born just to make lines. A robot could never do it better.
It feels strange, and I don’t really have words to describe it, maybe an epiphany. Each line feels sacred. I spend so long on each one that it feels like I am uploading my consciousness into it. It works most of the time, though there are moments when proportion or physical distractions pull me out. I can’t fully control this flow state yet, but I feel like I am on to something.
I want to see if I can bring this flow state into a workshop, maybe one focused on meditation, meditation on the line. I have always said I love etching because the plate feels like a collaborator, but for the first time, I think I finally understand what I meant. Maybe that is what life is: relearning the same truths we have understood since birth.
The Parade
Draft
Hardground
Stepbite
Inking Realization
I was at Hausprint thinking about what to do for my research festival. The idea of making a helmet intrigued me, and it felt like the perfect ending for the armor I had made. So I started doodling. I wanted this helmet to be less conventional, maybe not even a helmet at all. The more I drafted, the clearer the image became in my mind.
This figure with the helmet must be a high ranking officer, with a horse and an entire army at his command. So I started drawing the soldiers behind him. Boom! an image was formed, and now it had to become an etching.
I was still fascinated by the idea of the destiny of the line, so I decided to make each line as clean and purposeful as possible. Then I used traditional step biting aquatint for shading. I don’t really like how the stone wall turned out in the end; it feels like the wall is flowing along with the parade of officers.
That hit me, I was drawing the fall of Jericho from the Bible. Most of my etchings start from nothing. I nurture them until they become something recognizable, and the theme often appears just in time to help me finish the image. Trusting the process is always the hardest part, but letting go now and then is the best way to grow and to be surprised. Most of the time it will not work, but the few times it does, they are legendary.
I inked it the same way I have inked a thousand times, but this time something was off. All the aquatint came out lighter than I expected. That was when I started learning from Brian about the flexibility you can get from wiping a plate. You can treat it almost like a monoprint.
I decided not to use tissue paper for wiping at all. The scrim alone was enough for the lighter areas and helped keep the background dark. I also used small pieces of tissue paper to wipe the highlights, then a little bit of what I think is called “retroussage”. It means lifting a bit of ink from the etched lines to make them look softer and fuller.
I have never felt the need to do this before. I always prided myself on etching my plates so perfectly that even a full wipe would keep black as black and white as white. Now I have realised it is always a spectrum. It is never just one or zero.
I once heard an artist on Instagram say that inking up means wiping as little as possible. To know that there is another realm of possibility after the plate is etched, that is both a relief and an exciting new area to explore.
Spirit Resist

I then started thinking about what I could use this texture for. My first idea was to make a landscape, a beautiful scene with hills, sky, and a small house. I blocked out areas with normal rhind’s varnish and applied the spirit ground to the exposed parts. It looked great when it went into the acid, but the timing was off. The longer it etched, the more detail I lost. On the other hand, I needed it to bite long enough to get that deep black.
It was also hard to read the progress on zinc plates. They don’t darken without aquatint, so the open-bitten areas just turned into flat, muddy grey. The second plate had the same result — the open bites looked horrendous. Following Brian’s advice, I decided to drop the landscape idea and just draw a creature on a clear sheet of zinc. The medium was too unpredictable, you can’t really control where it flows when it’s evaporating quickly on a hot plate.
Still, I fell in love with the marks — especially the little worm shapes on the right side. They fit perfectly with the “worm at our core” theme I’ve been exploring. That’s when I realised what this texture could do for my practice, it could be the face of repression, a visual language that finally matched how I imagine it. It moves on its own, unpredictable and alive, like a Rorschach test for people to project their thoughts into. That moment changed everything. I decided to stop making the helmet and instead create a series of prints for my research festival.
There were still issues, zinc kept giving me those terrible open bites, so I switched to steel. When steel is open-bitten, it turns black instead of grey, which suited my imagery better. I was too excited, though, and wasted two beautiful zinc plates. They were not cheap either. Next time I’ll do more tests on small plates before diving straight into the big ones.
Documentations continue at Research festival
Spirit resist comes from an article from the 1970s in Print Quarterly magazine. I heard my friend Lizzie was trying it, so I was excited to see what it could bring to the table. It is not often that a new printmaking process comes along for me to experiment with.
After reading the article, I was quite confused about what the author was doing and how this technique created those cloud-like textures in the black and white image above. With no real understanding of how it worked, I just started mixing alcohol with resin.
I used ninety-nine percent alcohol instead of spirits like they used in the past. My thinking was that ninety-nine percent alcohol is easier to find and therefore more reproducible. Brian showed me how to safely extract resin from the resin bag and how to add new resin into the aquatint box, a crucial skill to learn if I ever take on the responsibility of maintaining a workshop.
For the first try, I simply mixed the two together at a ratio of three to eight, just as the magazine described.

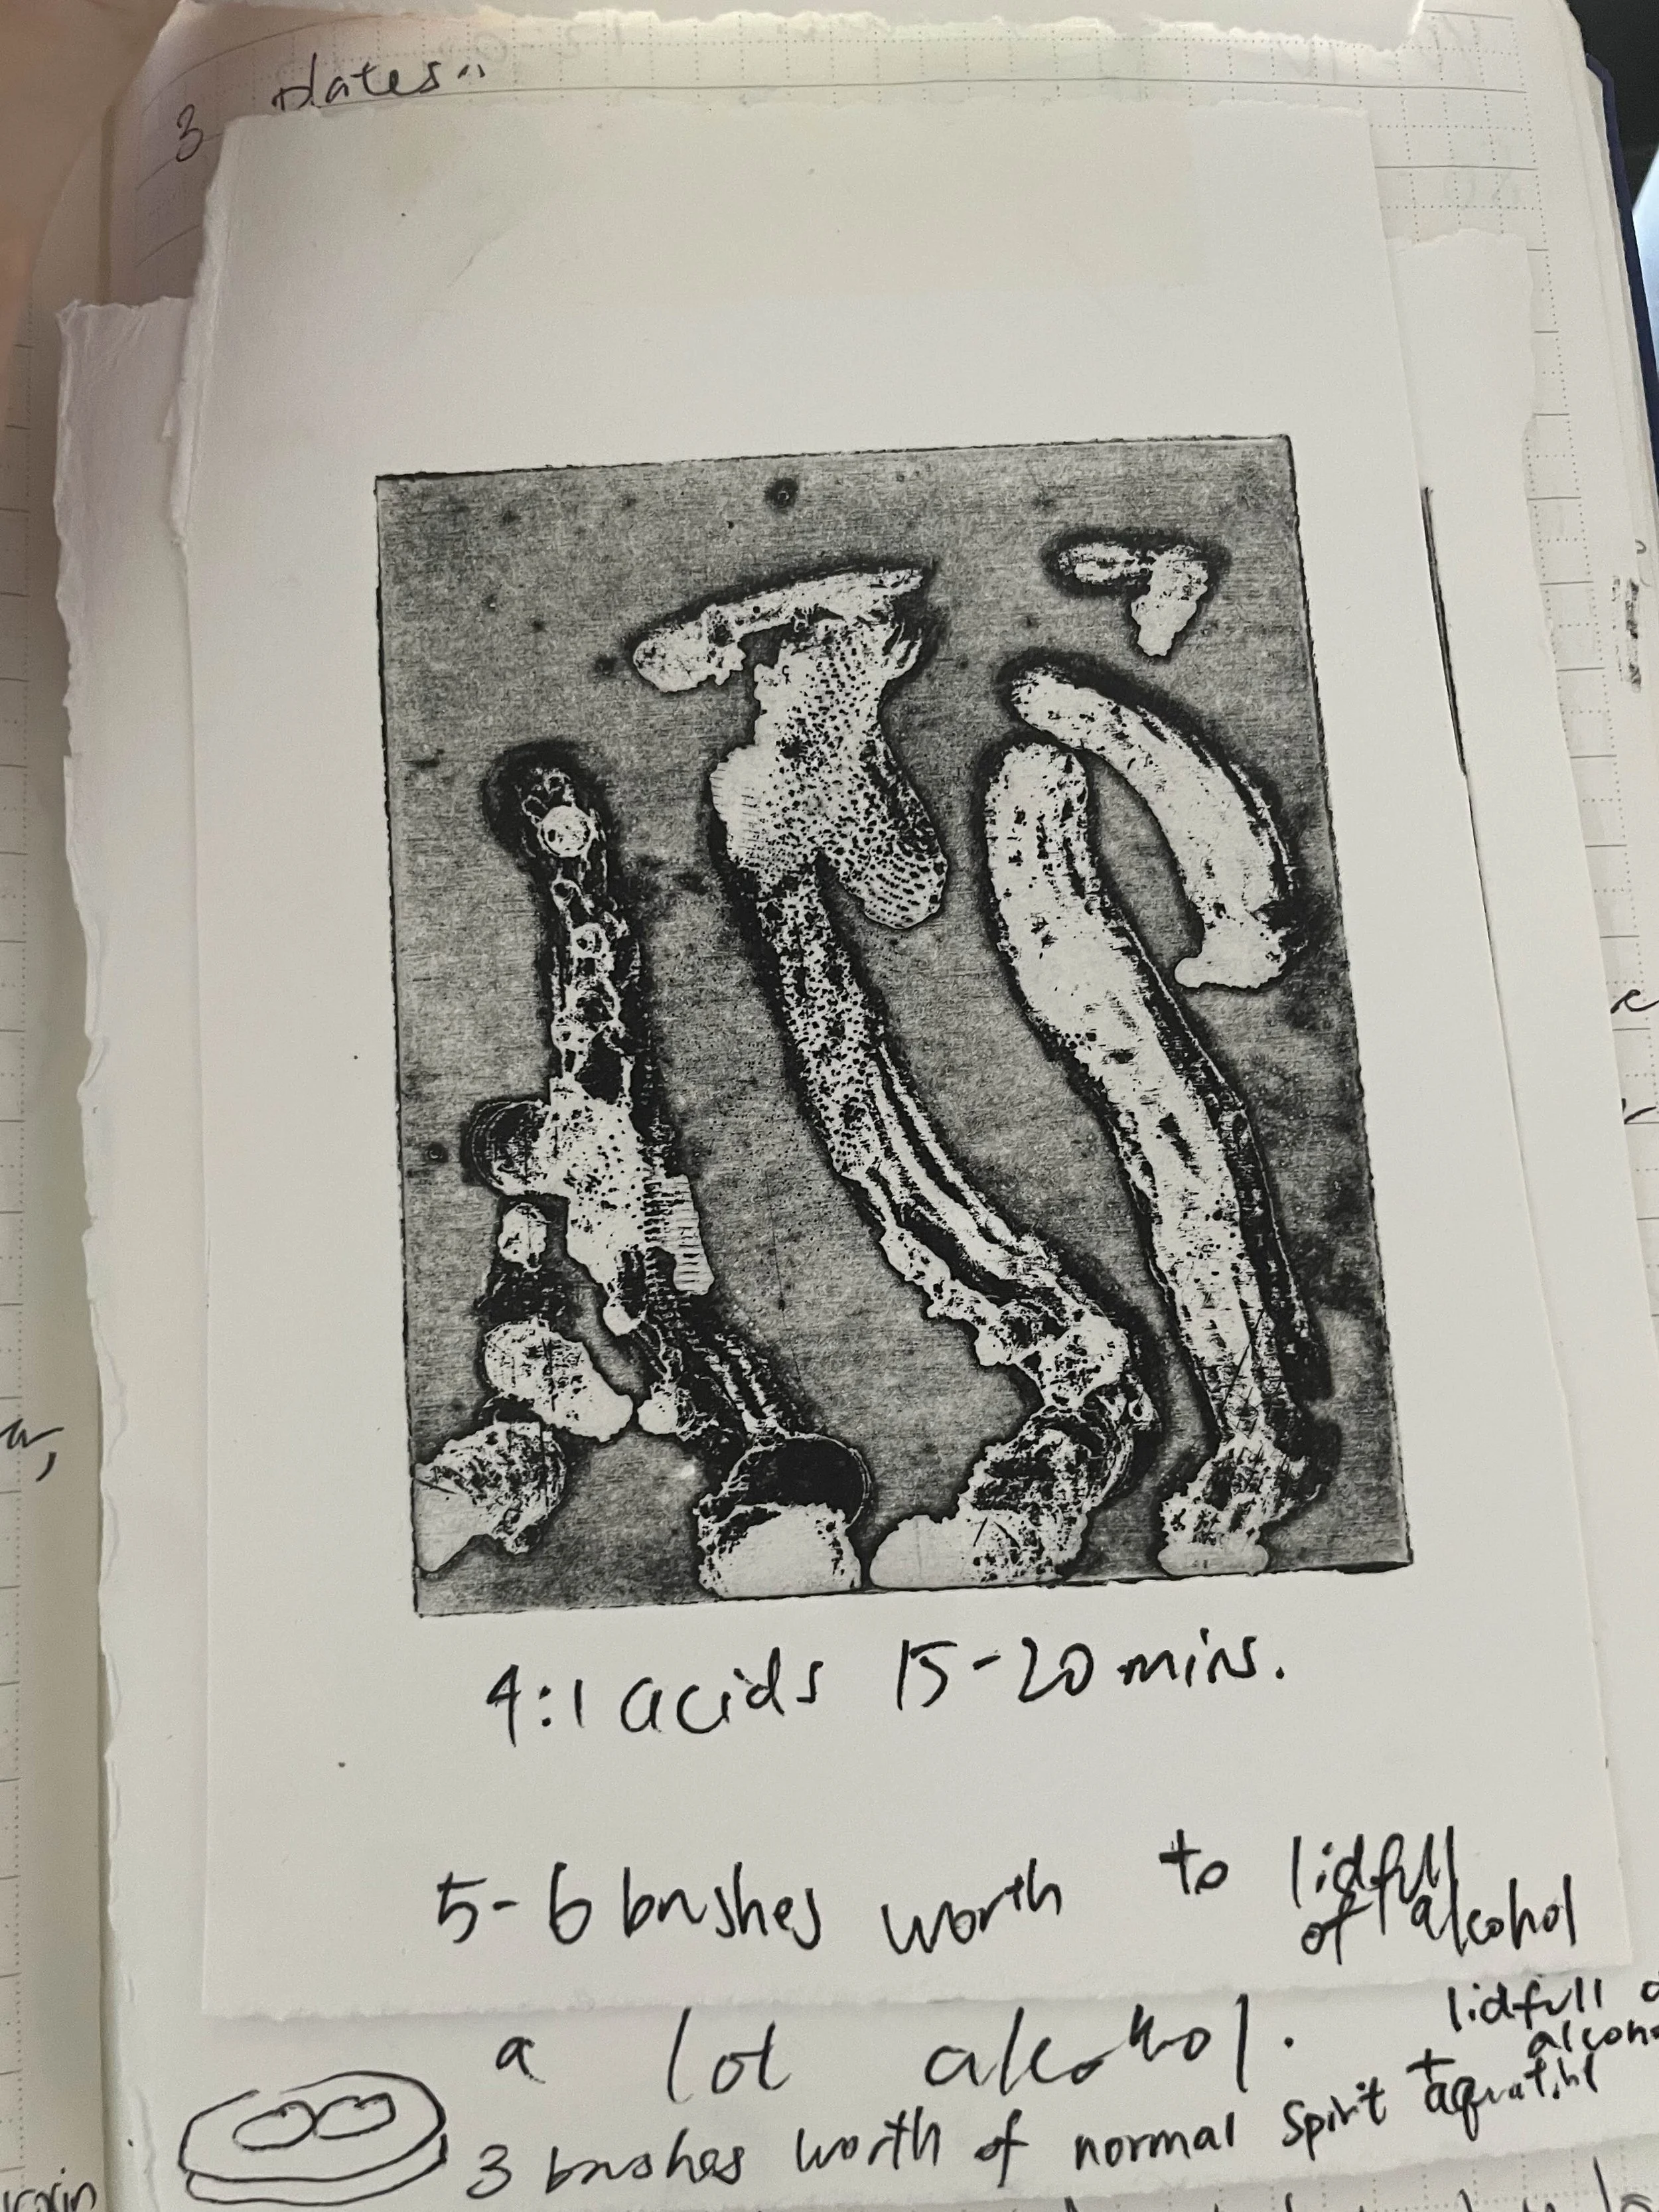
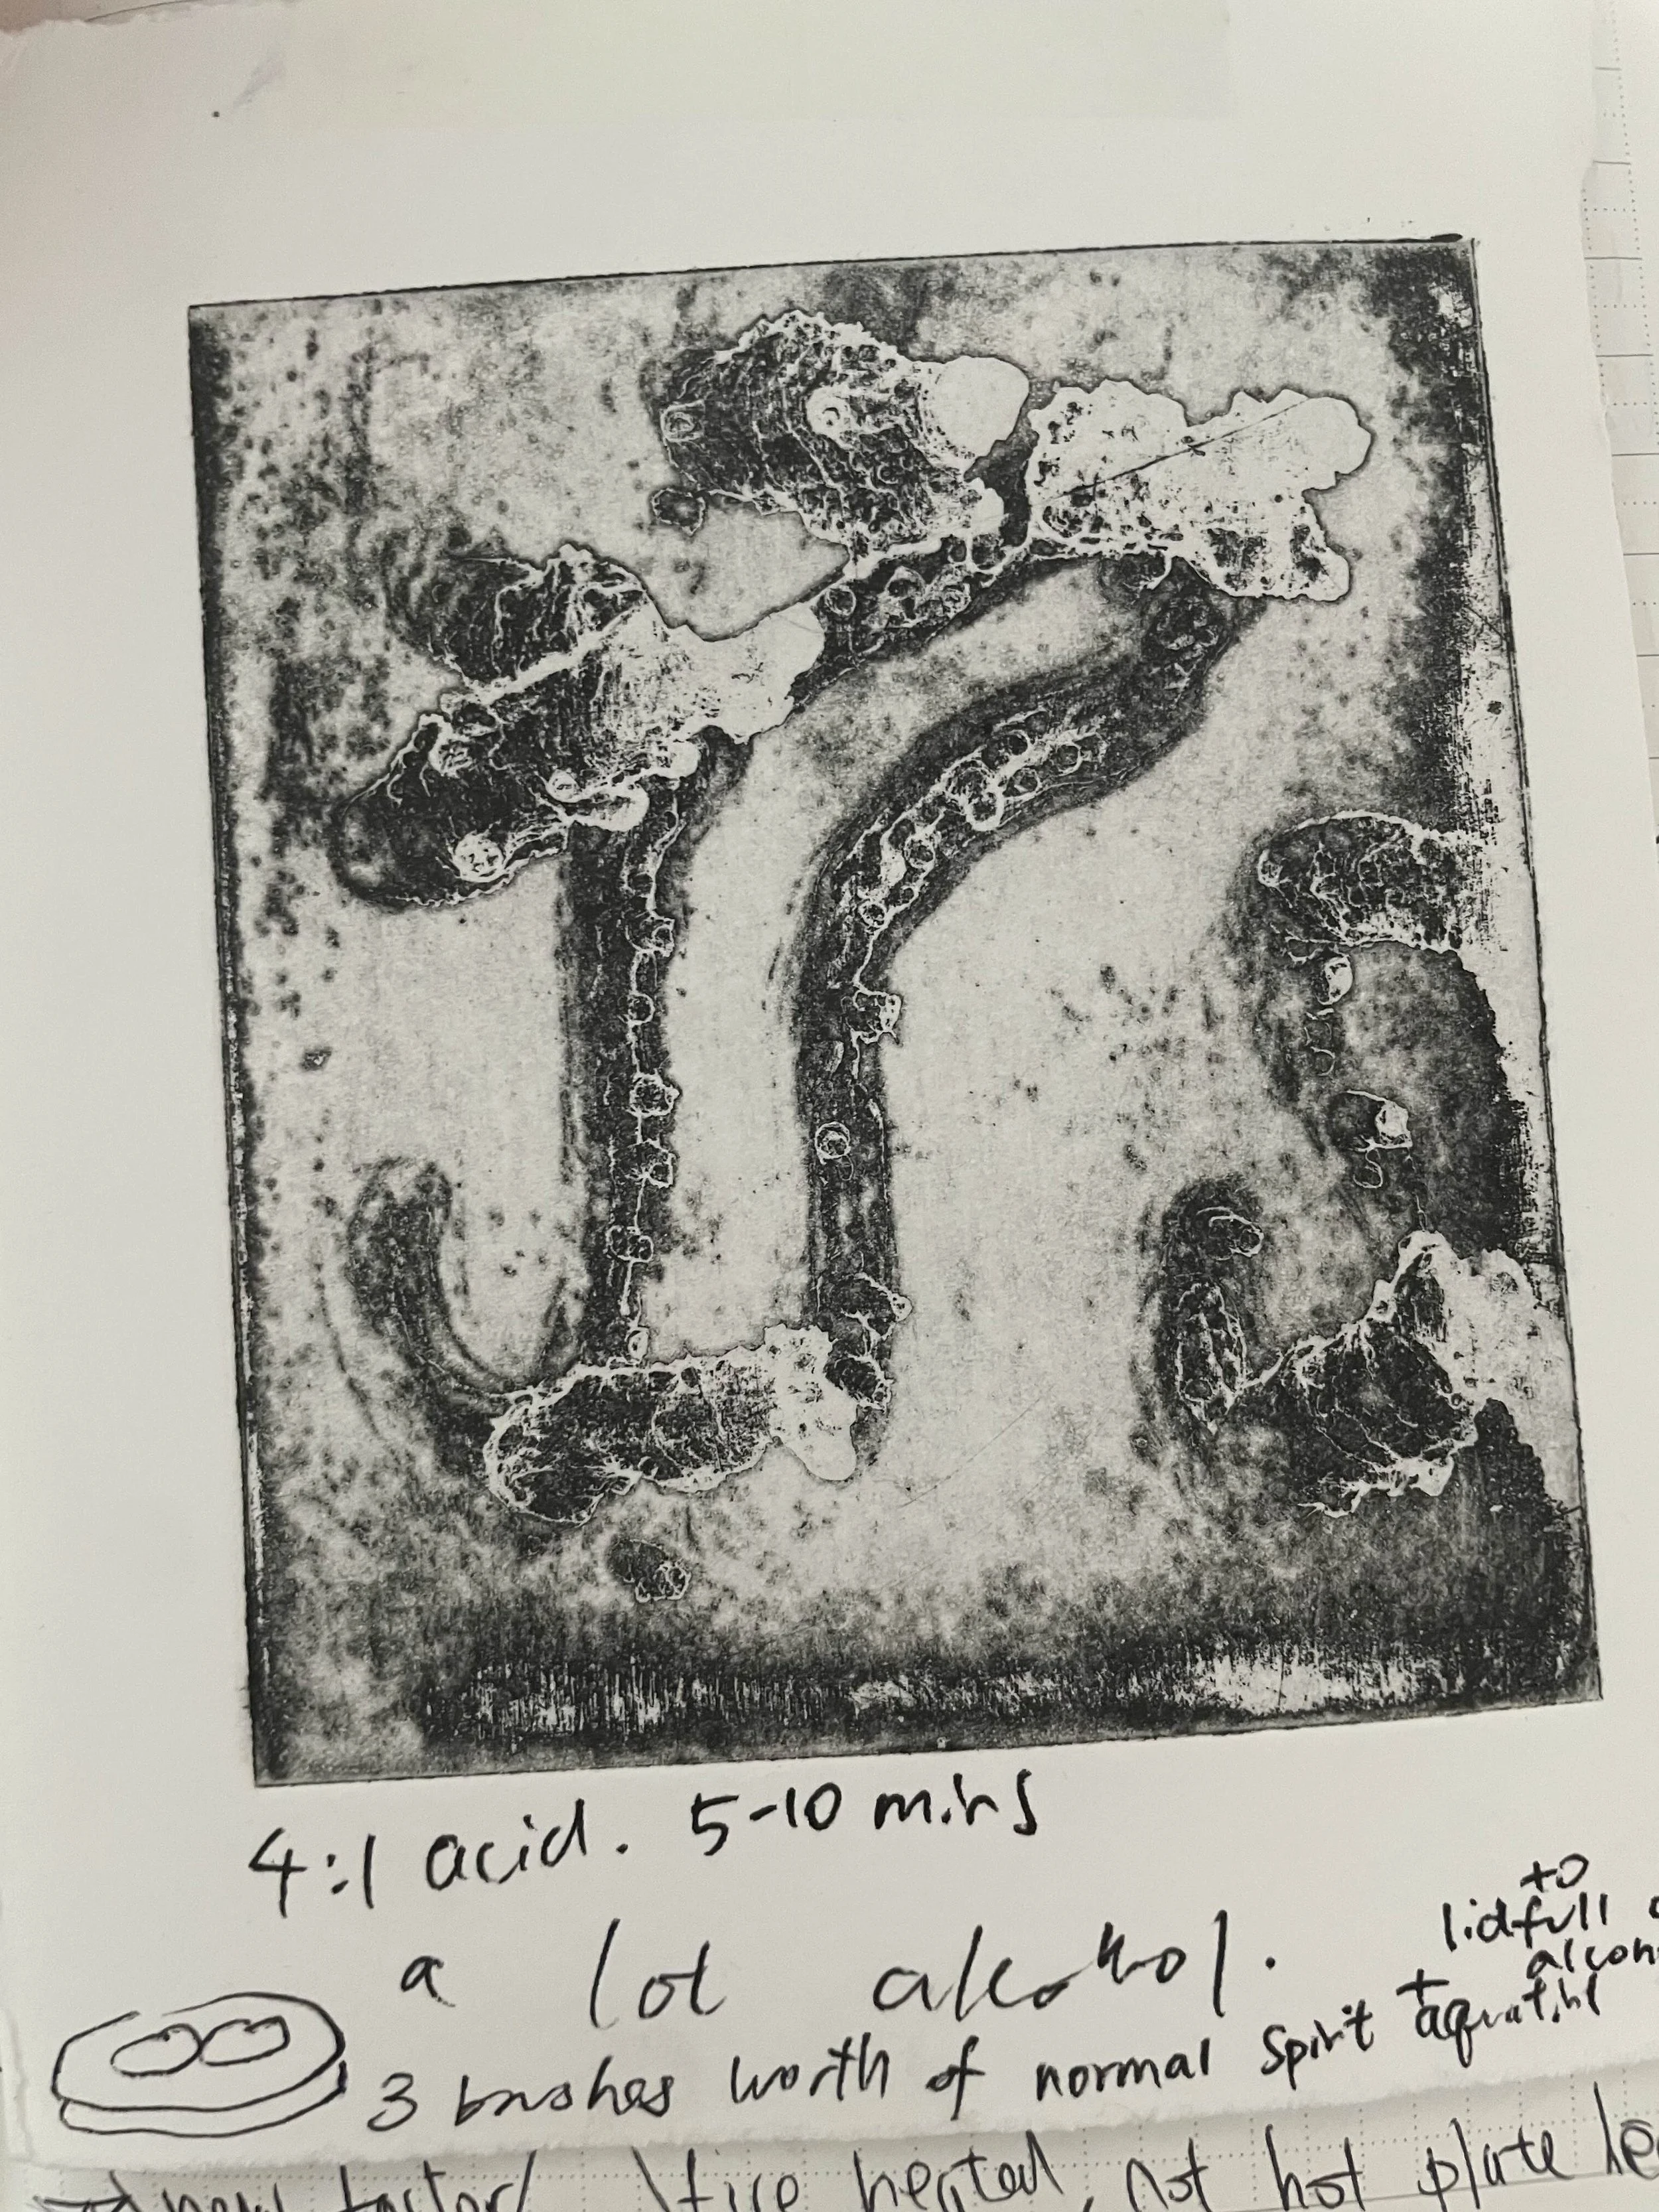
I then started experimenting on these little plates. The first one was way too strong, the rosin basically melted into a solid layer. It worked like a clear varnish, and anything I painted on top resisted the acid completely, leaving white patches. I then started mixing more alcohol into the solution to mess with the ratio of rosin. You can see that some of the painted marks could be etched, although I was using 4:1 nitric acid for this, so it was still quite strong and took a while to take effect.
I wanted to see how much more alcohol I could add before the rosin stopped working, so I set aside some of the solution on a lid and added a lot more alcohol to it. Surprisingly, it worked. It created this weird, washy texture that I have never seen before. The closest thing to it in etching would be white ground. That really caught my interest, and this is where the fun began. I should have recorded exactly how much alcohol I added to the mix so I could reproduce the result later, something I’ll remember for next time.